data2check documentation – Checking a Word document
Table of contents
1. Creating a configuration
Under the menu option »Configuration« you can create configurations for checking Word documents (see figure 1).
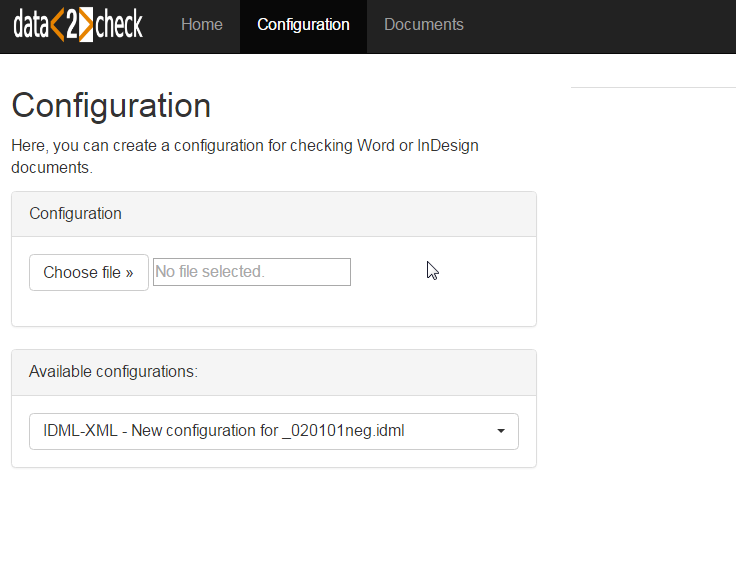
Figure 1: Creating a configuration for checking documents.
In order to be able to check a document according to your criteria, you must first create a configuration. Therefore, you need a template file (Microsoft Word) in which all paragraph and character styles required for your project were used at least once. This document serves as the basis for the configuration.
Here, you upload this template file and then create an appropriate configuration.
By clicking the »Choose file« button (see figure 2), your file manager opens where you select a template file (see figure 3). This file is the basis for the configuration which shall be created.
NOTICE: All formats of the files to be uploaded must be XML compatible. This means: please upload only files with the extension .docx for Microsoft Word!
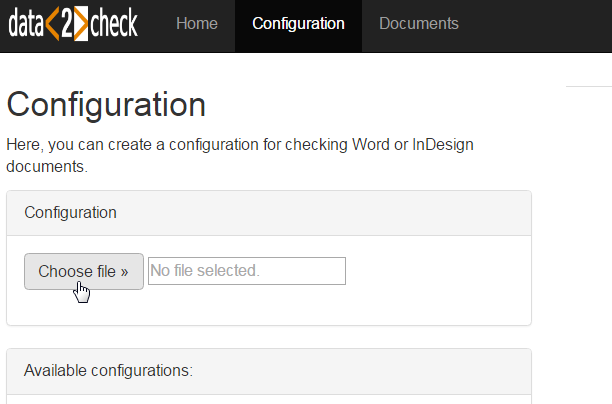
Figure 2: Upload of a template file - Step 1: Clicking »Choose file« to open the file manager.
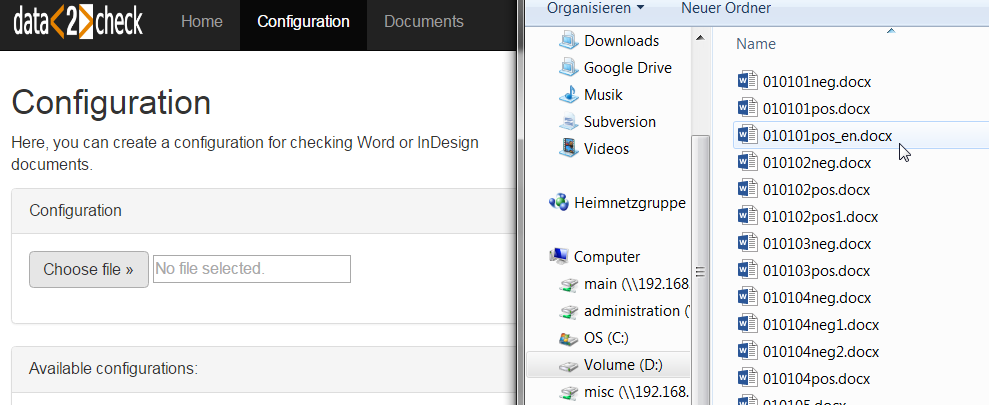
Figure 3: Upload of a template file - Step 2: Choosing a .docx file.
After selecting the file via double-click, the file name appears in the field next to the »Choose file« button (previously, »No file selected.« could be read here). Now click the green »Upload template file« button (see figure 4).
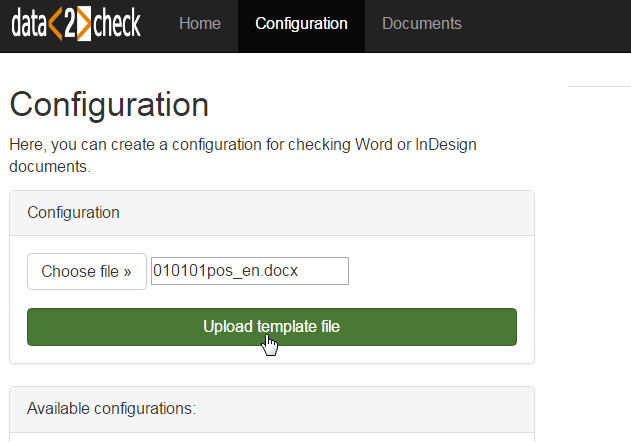
Figure 4: Upload of a template file - Step 3: Upload of the selected file.
During the upload of a file you will see a green bar displaying the progress of the upload (see figure 5). This process may take some seconds.
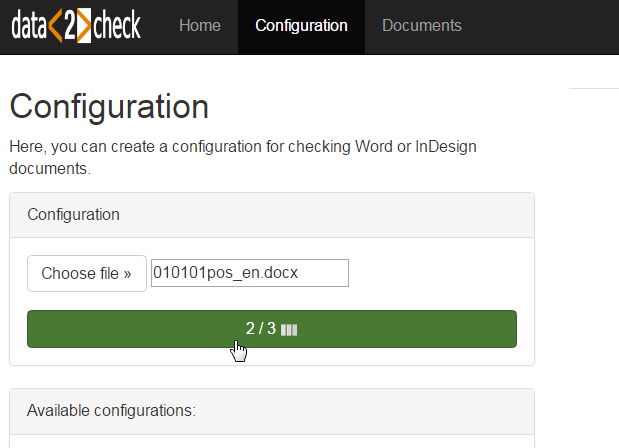
Figure 5: Green progress bar during the file upload.
After the successful upload of the template file, you get to the "Configuration Management" (right-hand side), where you have the possibility to edit your configuration(s) (see figure 6). For more details, see under 2. Editing a configuration.
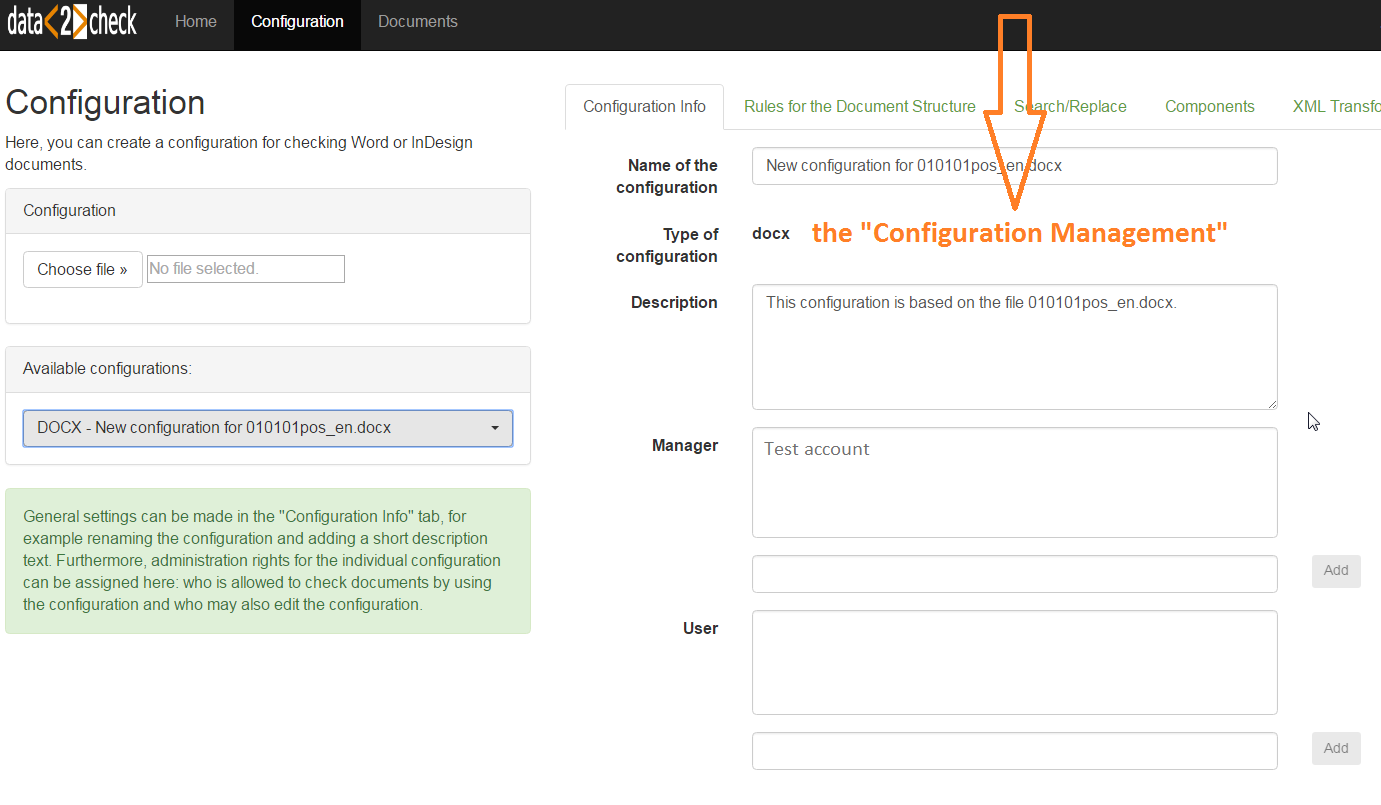
Figure 6: The Configuration Management.
Under »Available configurations:« (left-hand side) the individually available configurations are listed. In our example only one configuration is available: DOCX - New configuration for 010101pos.docx (see figure 7).
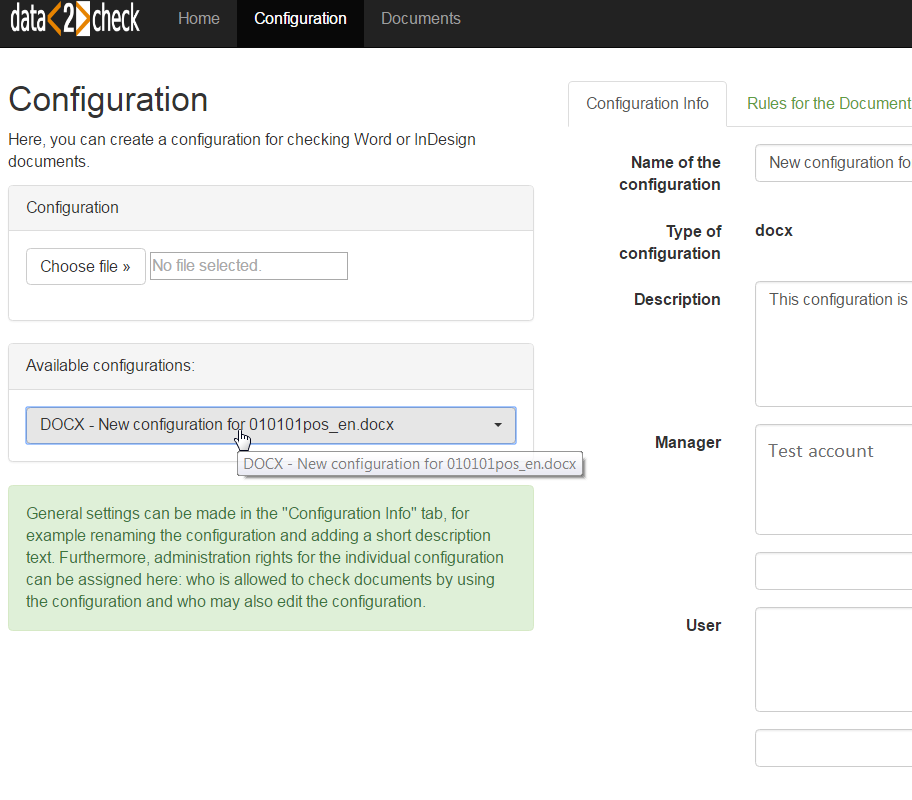
Figure 7: The available configuration after uploading the example template file.
In case you have already created several configurations, this dropdown list contains all of them; the latest (current) configuration appears at the bottom of the list, ticked with a check mark (see figure 8).
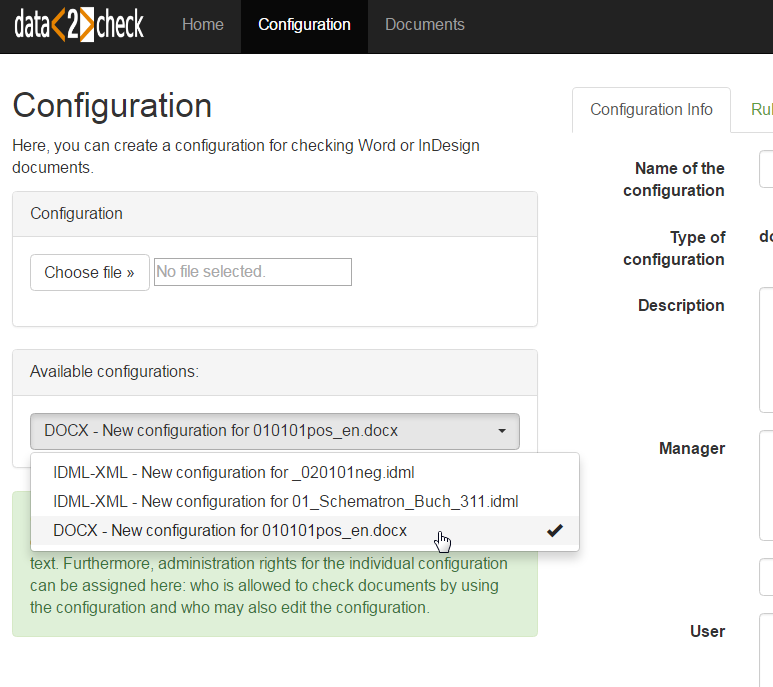
Figure 8: The current configuration can be recognized by the check mark.
The selected template file was successfully analyzed. Now, the newly created configuration can be edited.
The individual parts and options for editing a configuration are described in detail in the following.
2. Editing a configuration
Under the menu option »Configuration« a previously created configuration for checking documents can also be edited. This happens in the abovementioned "Configuration Management" (see figure 6).
The Configuration Management consists of the following tabs:
- Configuration Info
- Rules for the Document Structure
- Find and Replace Rules
- Components
- XML Transformation
Before you can adjust a configuration according to your requirements, you have to select one in the dropdown list under »Available configurations:« (left-hand side, see also figure 8).
2.1 The Configuration Info
In the Configuration Info tab under the menu option »Configuration« general settings for a configuration can be made (see figure 9).
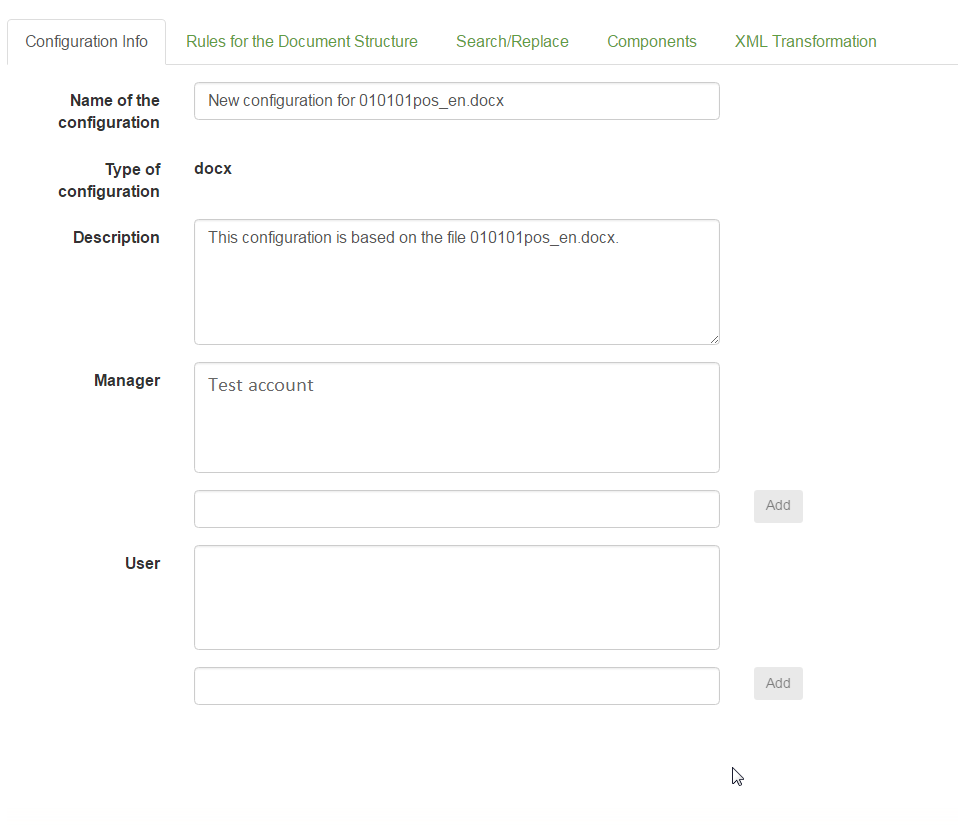
Figure 9: Possible settings in the »Configuration Info« tab.
Here, the created configuration can be renamed (input field »Name of the configuration«) and described in more detail (input field »Description«). On the one hand, this allows you to better assign a configuration to a project. On the other hand, the configuration can later be located more easily in case you want to create more than one configuration.
PLEASE NOTE: The default name of a newly created configuration consists of the words "New configuration for" plus the name of the uploaded file (including the file format). Per default, the input field »Description« contains the sentence "This configuration is based on the file [name of the template file].". You may delete the default texts in both input fields and also enter other texts (see figure 10).
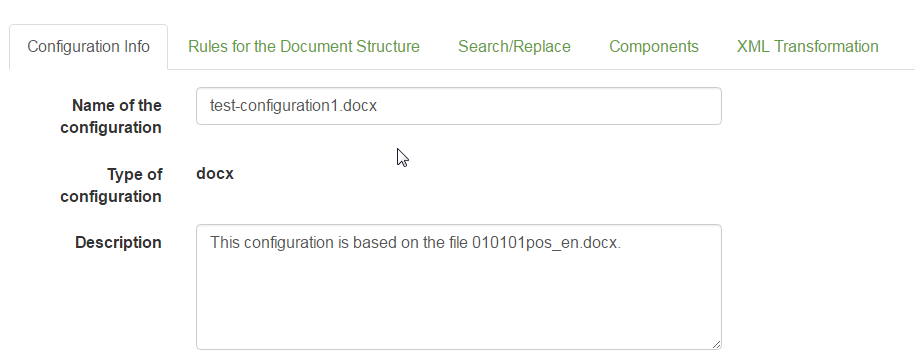
Figure 10: Changing the configuration name into "test-configuration1.docx".
TIP: In case you also create configurations for checking Adobe InDesign documents, just leave the file extension .docx in the name of the Word configurations and vice versa in order to avoid confusion for documents with the same name.
Furthermore, the "group manager" has the right to add as well as to delete other users and managers. Users are only allowed to use the configuration for checking documents, whereas managers may also change settings of the configuration or delete it. Further information on the "group" concept of data2check can be found under General part: 2. Registration.
NOTICE: Please do not forget to save the configuration after making the general settings!
2.2 Saving and deleting a configuration
All the settings you have made should be saved by clicking the »Save configuration« button at the bottom of each tab.
NOTICE: Always save your configuration before checking a document or creating and editing a new one!
An existing configuration can be deleted by clicking the »Delete configuration« button (see figure 11).
NOTICE: As a consequence, the configuration, including all settings, is permanently deleted and must then be created and edited again in order to be able to reuse it in its original form!
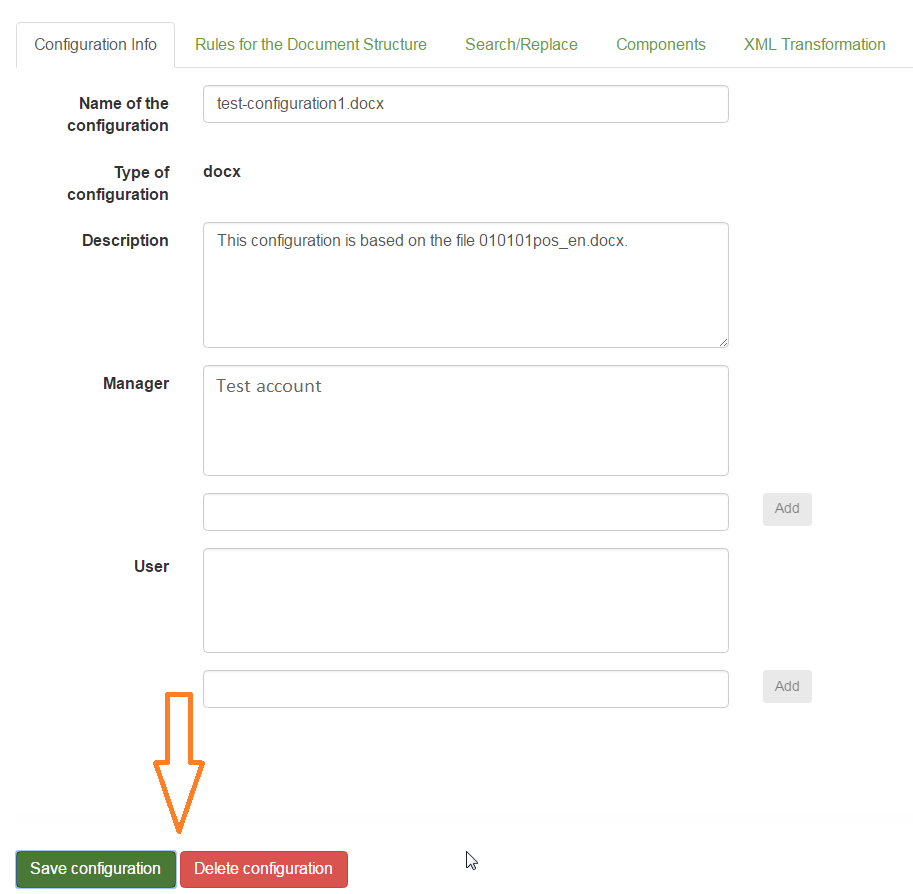
Figure 11: Saving or deleting a configuration.
2.3 Rules for the Document Structure
In the Rules for the Document Structure tab under the menu option »Configuration« all styles used in the Word template file are listed. Here, you can define rules for the handling of these styles in the document to be checked.
For each paragraph style used in the template file certain rules can be defined and specific relations between the styles can be permitted or prohibited. For example, you can specify whether a paragraph style has the status of a heading, which styles are permitted or prohibited for the previous paragraph and which character styles are permitted or prohibited for a certain paragraph style.
2.3.1 Rules for the first paragraph
Firstly, you can define which style the first paragraph of the document to be checked shall have (see figure 12). NOTICE: In this context, not necessarily the first paragraph in the running text is meant but the very first appearance of text in the document, which may be, for example, the text on the title page.
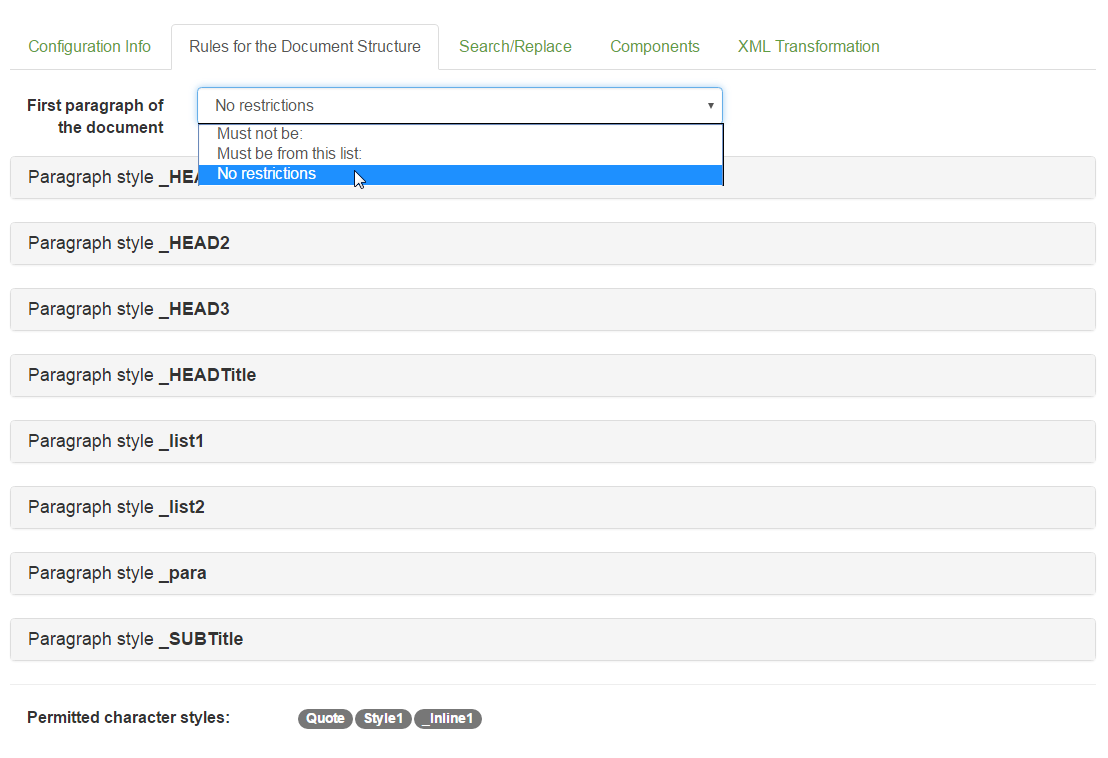
Figure 12: Defining styles for the first paragraph of the document.
By clicking the dropdown list, all three possible options for this setting are displayed. Please select one of them:
- No restrictions: Each of the available parapraph styles can be used for the first paragraph of the document to be checked.
- Must not be: With this option you can select in the following dropdown list the paragraph styles which, by no means, shall be used for the first paragraph of the document to be checked.
- Must be from this list: With this option you can select in the following dropdown list the paragraph styles which can be used for the first paragraph of the document to be checked.
Under option 2 and 3 already selected paragraph styles can also be deleted from the selection with the »Remove from list« button (see figure 13).
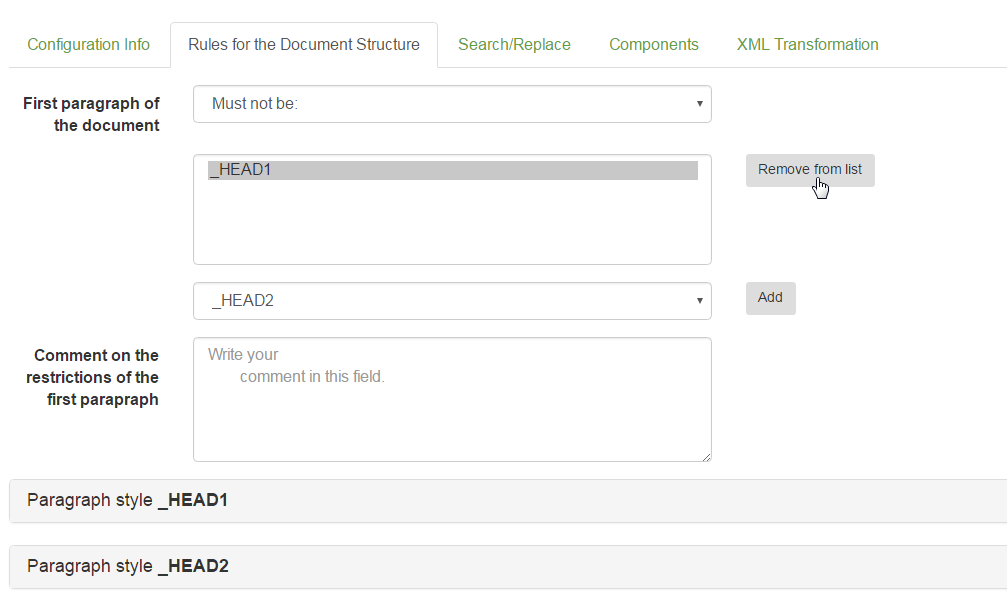
Figure 13: Removing selected styles from a list.
In addition, you may enter an individual error comment in the »Comment on the restrictions of the first parapraph« field. After successfully checking a document, the comment specified here appears on the first paragraph in the Word output document in case the checked document violates this rule (see figure 14).
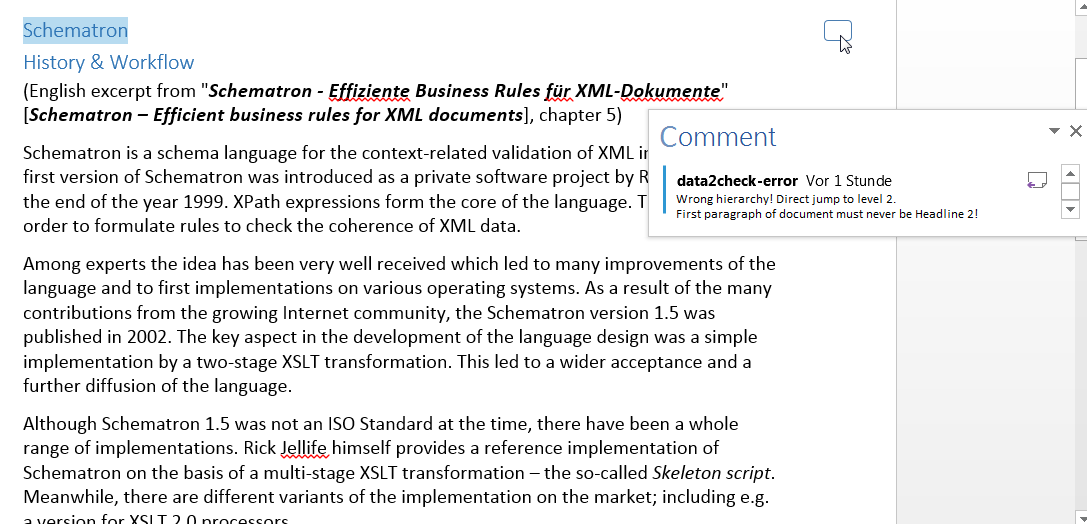
Figure 14: Comment on the first paragraph in the Word output document.
2.3.2 Rules for the paragraph styles
Next, every single paragraph style used in the template file is listed individually with its setting options (see figure 15 and the following table). In this list the names of the individual paragraph styles are highlighted in bold characters, for example "Paragraph style _HEAD1".
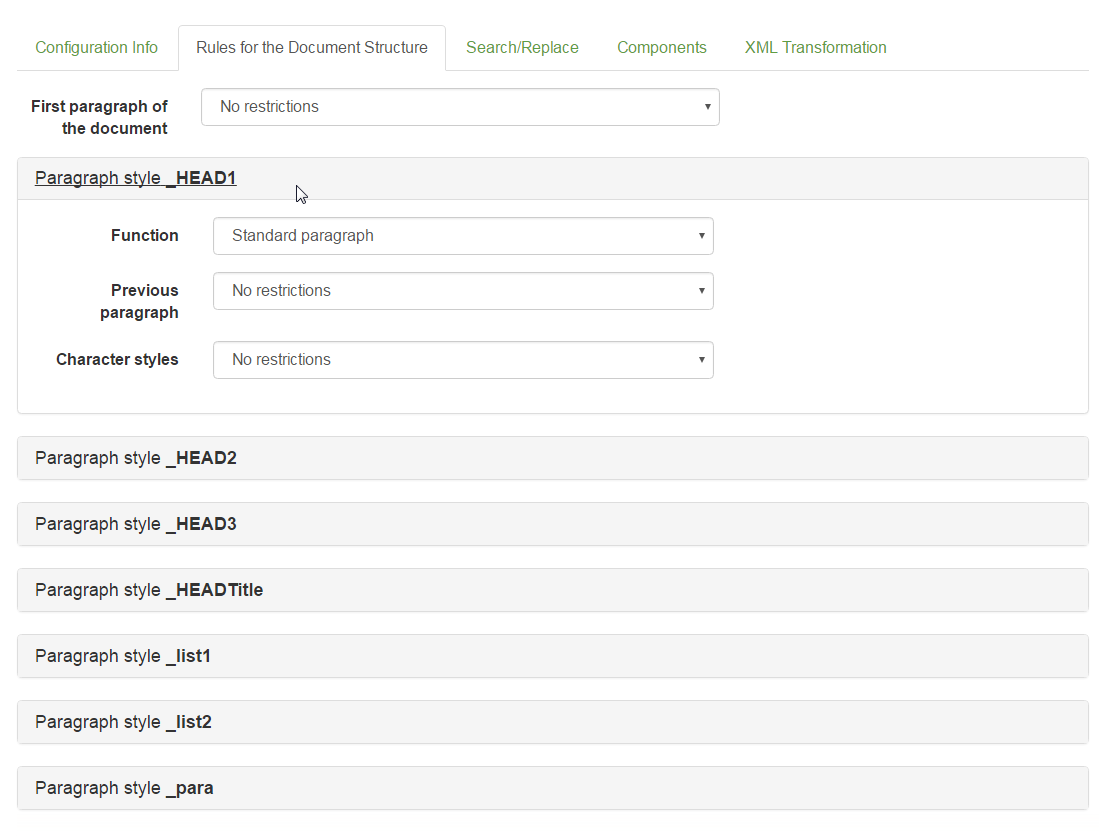
Figure 15: Paragraph styles in a Word configuration with the possible settings (exemplary presentation).
Table: The paragraph styles with their setting options.
| Component | Description/Options | Example |
|---|---|---|
| Paragraph style | Name of the respective paragraph style | HEAD 1 |
| Function |
|
HEAD1 has heading level 1, which means it is a headline of first order. |
| Previous paragraph | Here, you can decide which paragraph styles are permitted or prohibited for the previous paragraph. The same three options as under 2.3.1 Rules for the first paragraph (no restrictions, must not be, must be from this list) can be selected. | The previous paragraph of HEAD1 must not be: para and HEAD2. |
| Comment on the restrictions of the previous parapraph | Here, the settings regarding the previous paragraph can be commented. After successfully checking a document, the specified comment appears on the respective paragraph in the Word output document in case the checked document violates this rule (the principle is similar to that explained in figure 14). | para and HEAD2 are prohibited before HEAD1! |
| Character styles | Here, you can decide which character styles (inline formats, for example "italic" or "bold") are permitted or prohibited in the respective paragraph style. The same three options as under 2.3.1 Rules for the first paragraph (no restrictions, must not be, must be from this list) can be selected. | A permitted character style must be from this list: _Inline1 and Quote. |
| Comment on the restrictions of the character styles | Here, the settings regarding the permitted character styles can be commented. After successfully checking a document, the specified comment appears on the respective paragraph in the Word output document in case the checked document violates this rule (the principle is similar to that explained in figure 14). | Only _Inline1 and Quote are permitted as inline formats in para! |
For the sake of completeness, at the end of the tab (»Permitted character styles:«) all character styles used in the template file are listed under the paragraph styles just described (see figure 16).
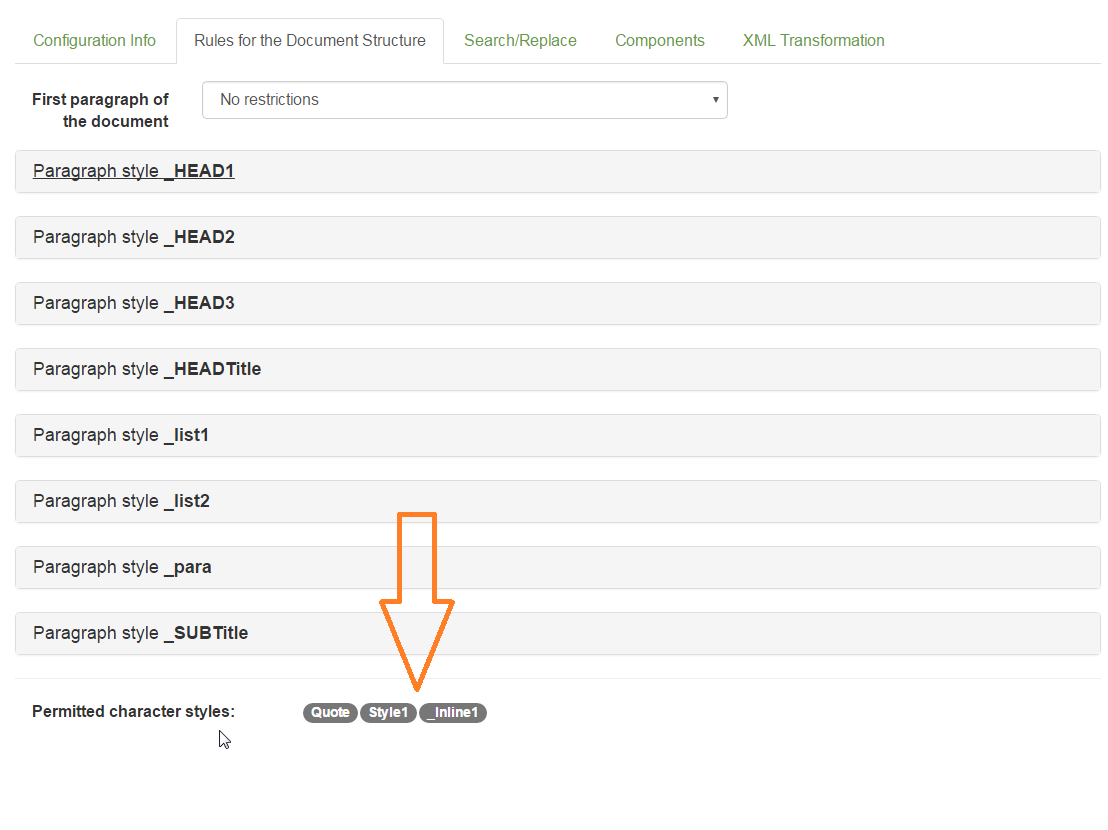
Figure 16: The character styles used in the template file (exemplary presentation).
NOTICE: Please do not forget to save the configuration after defining the rules for the styles!
2.4 Find and Replace Rules
In the Search/Replace tab under the menu option »Configuration«, for micro-typographical purposes, you can search for certain character combinations appearing in the document to be checked. In the output document, these character combinations will be replaced automatically and/or marked via error messages (in the form of a Word comment). You can search for regular expressions and normal strings. Optionally, the change tracking can be turned on in the Word output document when replacing.
You can create any number of Find and Replace Rules for the document to be checked. Please click for each new rule the »Add a new rule« button (see figure 17).

Figure 17: Creating a new Find and Replace Rule.
Now, an input mask appears where you can enter your search term in the »Find« field (see figure 18).
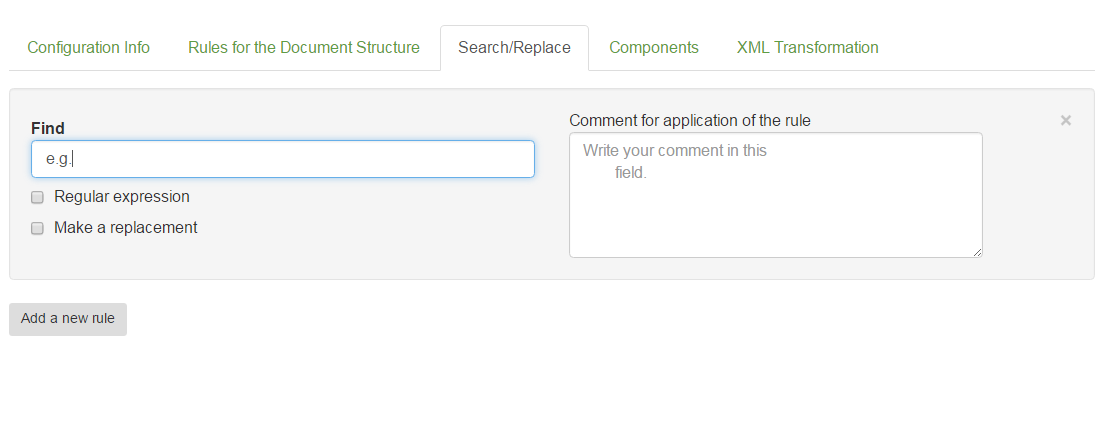
Figure 18: Entering a search term (Notice: please use only valid characters!).
TIP: You may search for single words, (several) space characters, letter combinations (for example EUR), abbreviations (for example e.g.), groups of words and also for whole sentences. Breaks, however, can only be included in the search in the form of regular expressions.
NOTICE: By no means, the »Find« field should be left empty since the configuration becomes invalid and cannot be saved anymore! If you change your mind and decide you do not want to create a Find and Replace Rule for the configuration, please click the small x on the right side of the input mask in order to delete the rule (see figure 19).
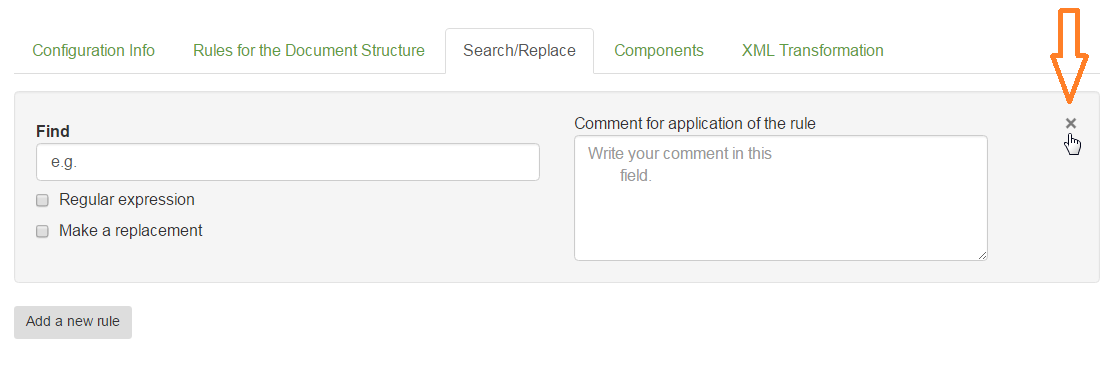
Figure 19: Deleting a Find and Replace Rule.
Optionally, you can activate the »Regular expression« checkbox if you wish that the search string shall be interpreted as a regular expression (see figure 20).
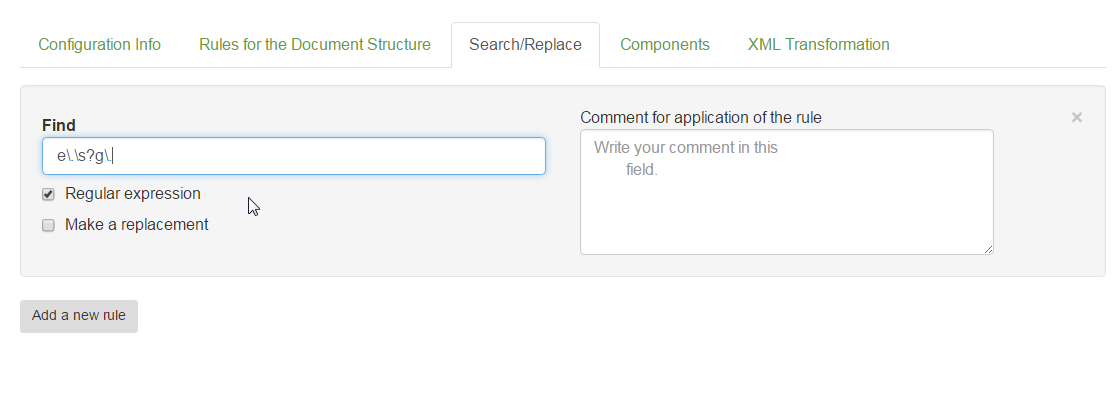
Figure 20: Treating the search term as a regular expression.
When activating the »Make a replacement« checkbox, the »Replace by« field appears in which you can enter your replacement string (see figure 21).
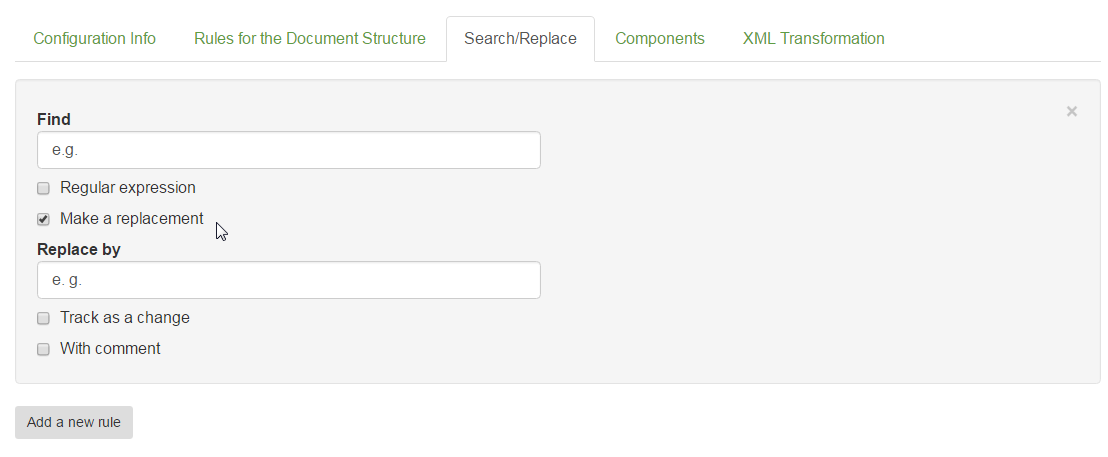
Figure 21: Replacing the search term.
TIP: As replacement string you may enter single words, (several) space characters, letter combinations (for example EUR), abbreviations (for example e.g.), groups of words and also whole sentences. Breaks, however, can only be included in the search in the form of regular expressions. Furthermore, this field can be left empty. In this case, the search string would be deleted in the Word output document.
In case you want to make a replacement, you can highlight it in your Word output document. On the one hand you may activate the »Track as a change« checkbox (see figure 22a) if you wish to mark the replacements per change tracking in the Word output document (see figure 22).
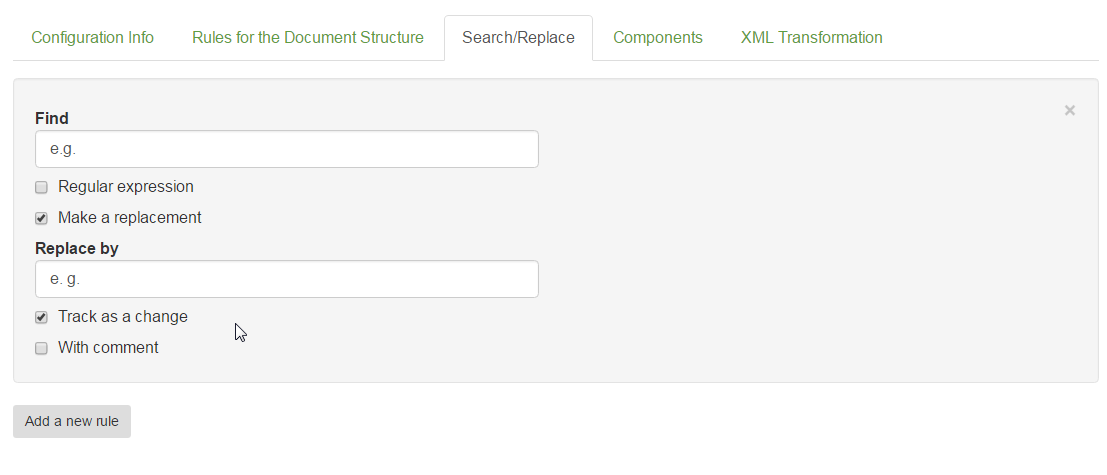
Figure 22a: activated »Track as a change« checkbox.
![]()
Figure 22: The Track Changes function in the Word output document indicates the replacement.
On the other hand you may activate the »With comment« checkbox if you wish that an own error message in the form of a comment is inserted wherever the search string is found in the Word output document (see figure 24). For that purpose, you enter your comment in the »Comment for application of the rule« field on the right-hand side (see figure 23).
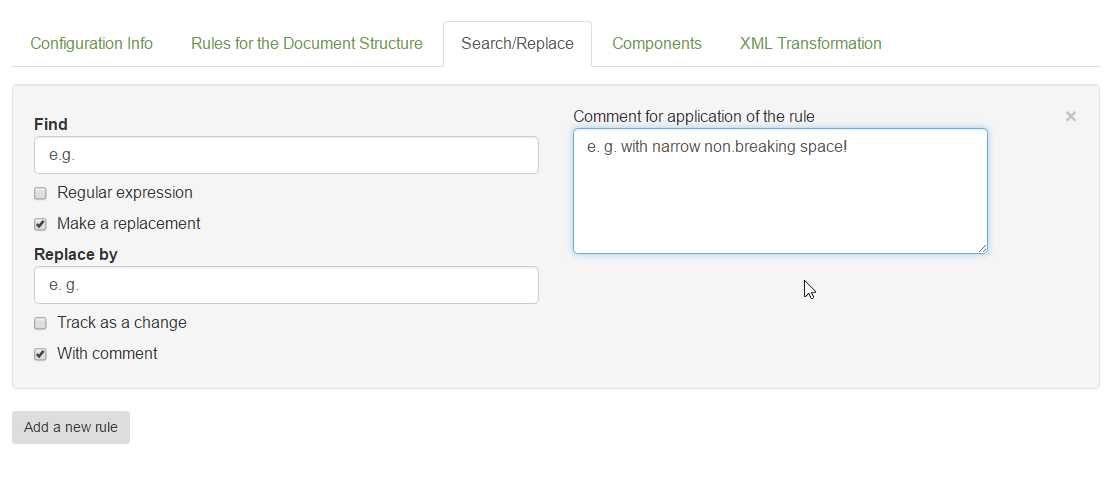
Figure 23: Entering an indivudual comment for the Find and Replace Rule.
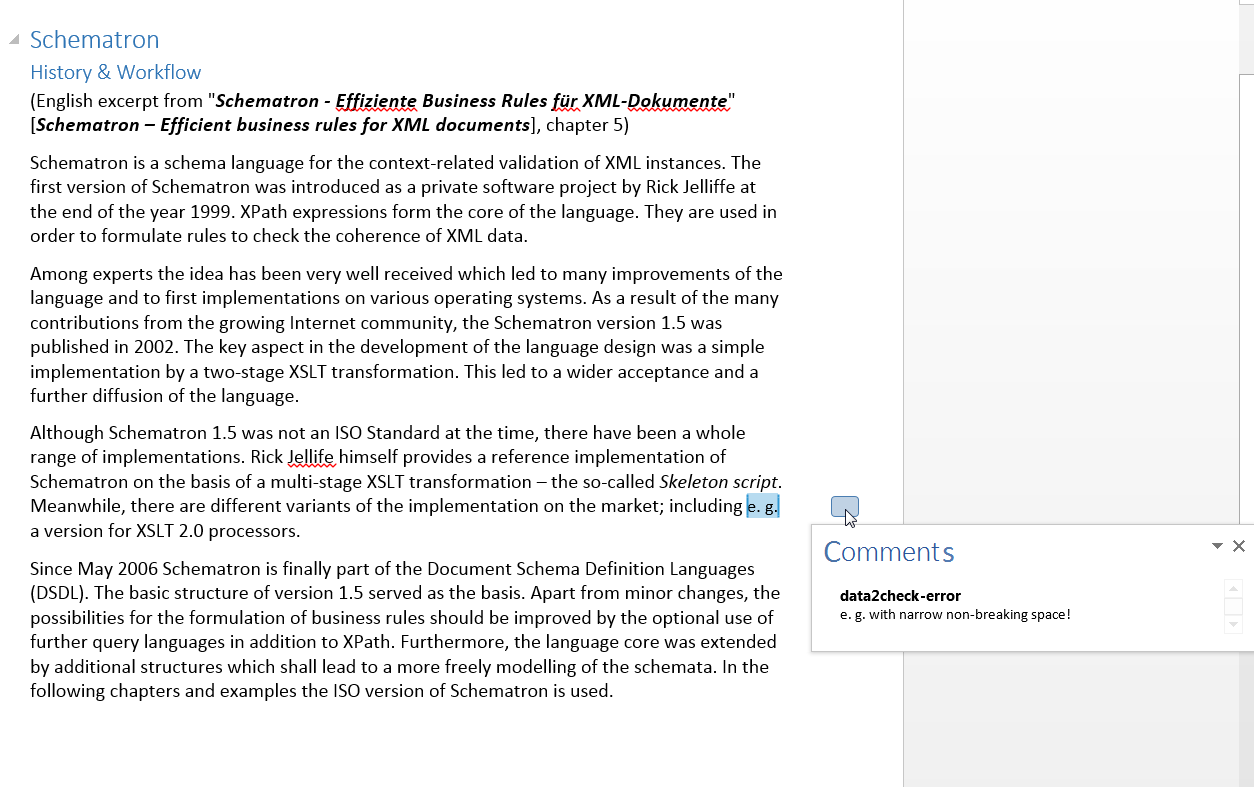
Figure 24: Comment on the Find and Replace Rule in the Word output document.
NOTICE: Please do not forget to save the configuration after creating a new Find and Replace Rule!
2.5 Components
In the Components tab under the menu option »Configuration« you can determine which Word-specific components and objects, such as pictures, comments and charts, are permitted in the document to be checked and which are not. A distinction is drawn betweeen the categories "Pictures", "Editing" and "Objects" (see figure 25).
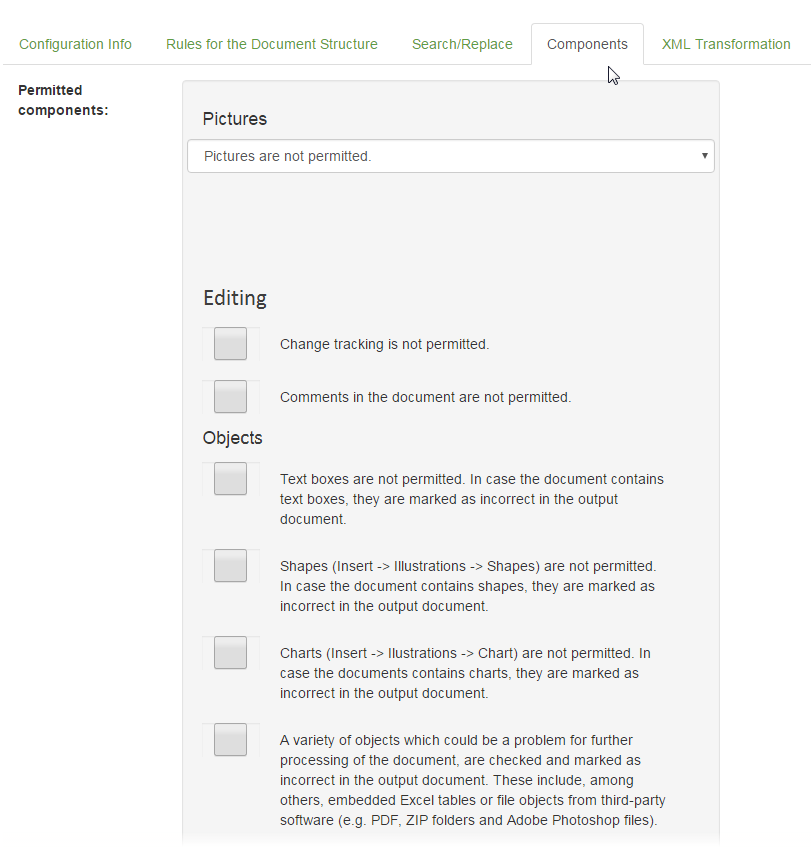
Figure 25: Permitting or prohibiting certain components in Word documents.
In the Word output document, "forbidden components" are pointed out in the form of comments (see figure 26).
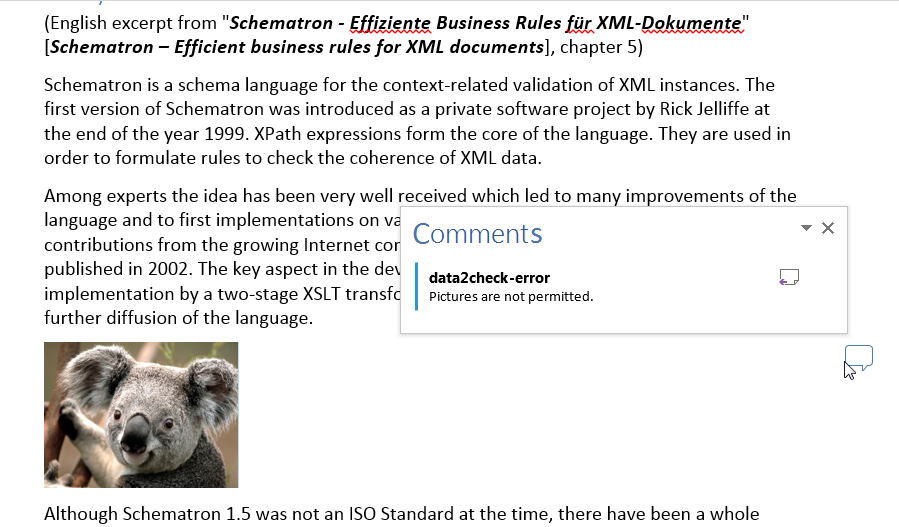
Figure 26: Comment in the output document on a prohibited picture. Pictures are not permitted for the document to be checked. However, a picture was used here.
2.5.1 Category »Pictures«
In the »Pictures« category you can set up rules regarding the format and the positioning of pictures inserted in the document to be checked (see figure 27).

Figure 27: Four possible settings for picture formats.
The following four options are available:
- Pictures are not permitted: In the document to be checked no pictures at all are allowed. If it contains any picture (no matter which format), an error comment appears at the relevant text passage in the Word output document.
- All picture formats are permitted: The document is not checked for the existence of pictures. All picture formats supported by Microsoft Word are allowed in the document to be checked.
- Only TIFF pictures are permitted: Only pictures with the TIFF format are allowed in the document to be checked. If it contains any other picture format, an error comment appears at the relevant text passage in the Word output document.
- Only JPEG pictures are permitted: Only pictures with the JPEG format are allowed in the document to be checked. If it contains any other picture format, an error comment appears at the relevant text passage in the Word output document.
In case you have selected one of the options 2 to 4, two checkboxes appear with whom you can define the positioning of your pictures (see figure 28).
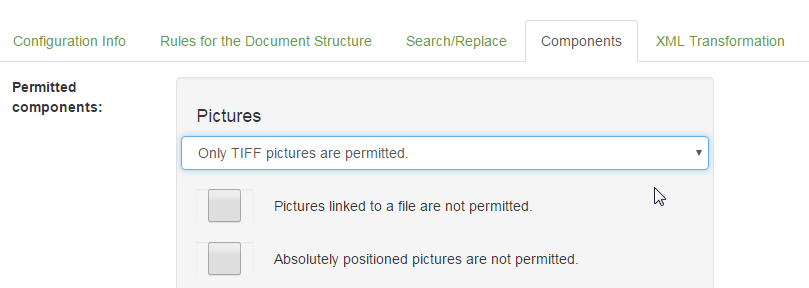
Figure 28: Permitting pictures linked to a file or absolutely positioned pictures.
By activating the checkbox »Pictures linked to a file are not permitted.«, the expression »Pictures linked to a file are permitted.« appears. This allows you to also permit pictures in the document to be checked which were not embedded but inserted per link to another file (see figure 29).
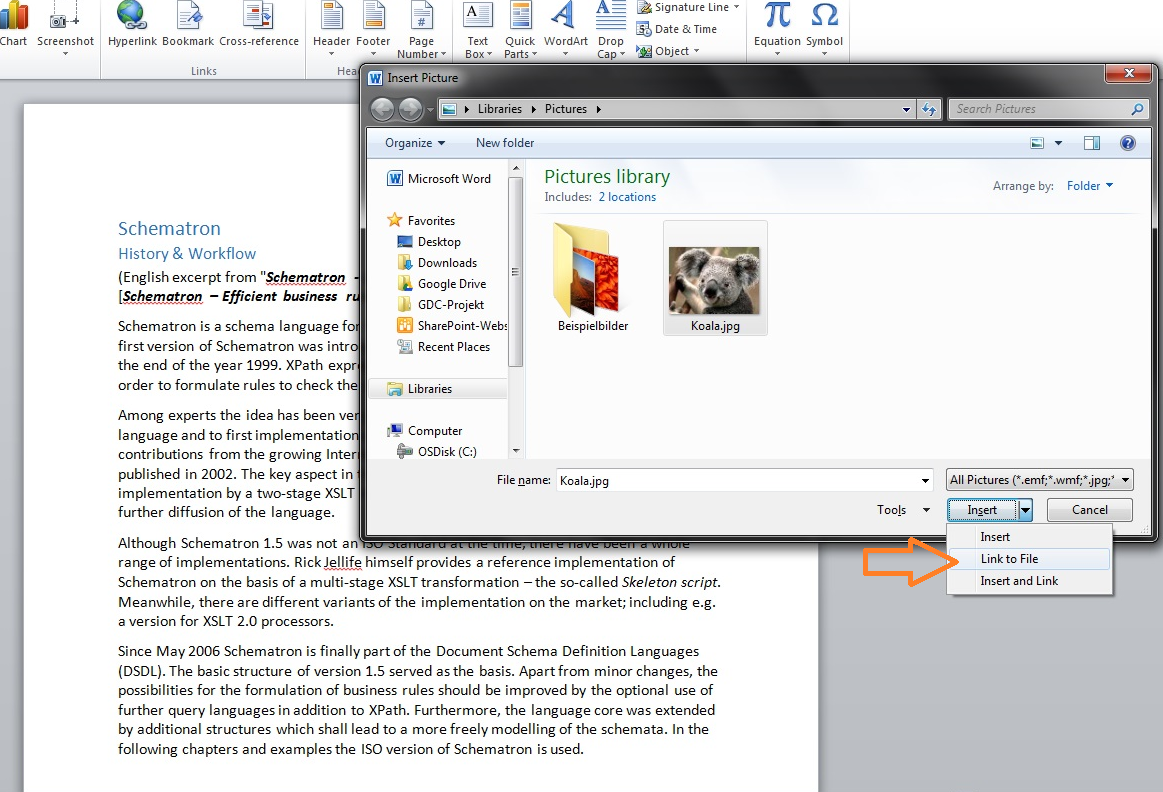
Figure 29: Inserting a picture in Word per link to a file.
By activating the checkbox »Absolutely positioned pictures are not permitted.«, the expression »Absolutely positioned pictures are permitted.« appears. This allows you to also permit pictures in the document to be checked being positioned outside the running text, which means the picture was anchored by using the Word layout option »With Text Wrapping« (see figure 30). By default, only pictures are permitted being positioned within the running text, which means by using the Word layout option »In line with Text«.
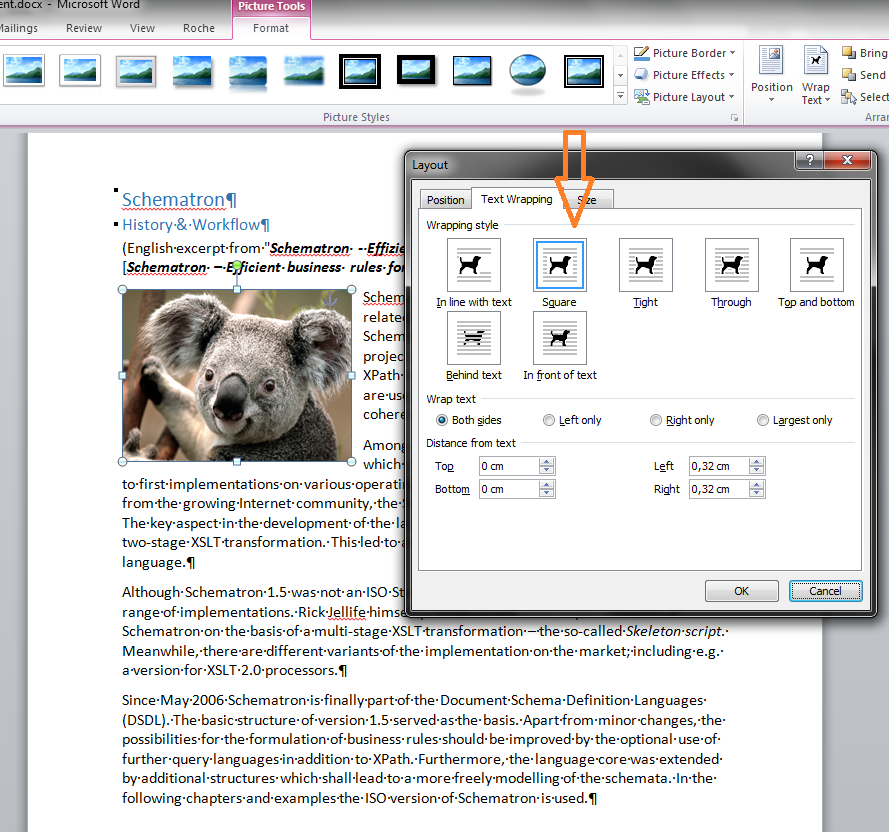
Figure 30: Positioning a picture in Word; layout option »With Text Wrapping«.
2.5.2 Category »Editing«
In the »Editing« category you can set up rules regarding "correction entries" in the document to be checked. These include Word comments and the Track Changes function (see figure 31).
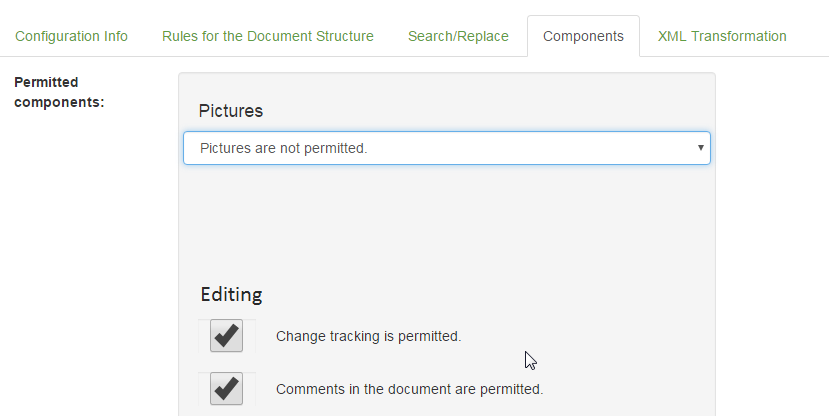
Figure 31: Permitting change tracking and comments in the document to be checked.
By activating the checkbox »Change tracking is not permitted.«, the expression »Change tracking is permitted.« appears. When using the Track Changes function in Word, this allows you to permit changes in the document to be checked being possibly not accepted. However, this may lead to problems when further processing the document at a later time!
By activating the checkbox »Comments in the document are not permitted.«, the expression »Comments in the document are permitted.« appears. This allows you to permit Word comments in the document to be checked. However, this may lead to problems when further processing the document at a later time!
2.5.3 Category »Objects«
In the »Objects« category you can permit or prohibit objects inserted in the document to be checked, as for example text boxes, Excel tables and charts (see figure 32).
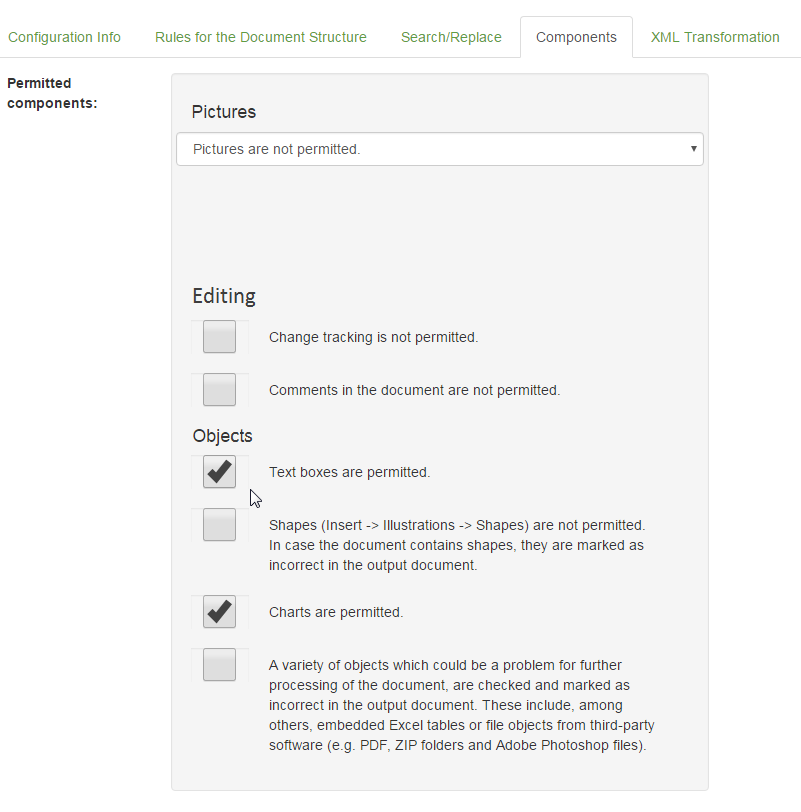
Figure 32: Permitting certain Word objects.
By activating the checkbox »Text boxes are not permitted. In case the document contains text boxes, they are marked as incorrect in the output document.«, the expression »Text boxes are permitted.« appears. This allows you to permit this type of Word object in your document to be checked.
By activating the checkbox »Shapes (Insert -> Illustrations -> Shapes) are not permitted. In case the document contains shapes, they are marked as incorrect in the output document.«, the expression »Shapes are permitted.« appears. This allows you to permit this type of Word object in your document to be checked.
By activating the checkbox »Charts (Insert -> Ilustrations -> Chart) are not permitted. In case the documents contains charts, they are marked as incorrect in the output document.«, the expression »Charts are permitted.« appears. This allows you to permit this type of Word object in your document to be checked.
By activating the checkbox »A variety of objects, which could be a problem for further processing of the document, are checked and marked as incorrect in the output document. These include, among others, embedded Excel tables or file objects from third-party software (e.g. PDF, ZIP folders and Adobe Photoshop files).«, the expression »Other types of objects are permitted, e.g. Excel tables or third-party file objects.« appears. This allows you to permit this type of Word object in your document to be checked.
NOTICE: Please do not forget to save the configuration after permitting certain Word components!
2.6 XML Transformation
In the XML Transformation tab under the menu option »Configuration« the structure of the automatically generated XML document can be adapted. This XML document is generated when checking a document and appears among the check results (XML version of the document, see figure 33).
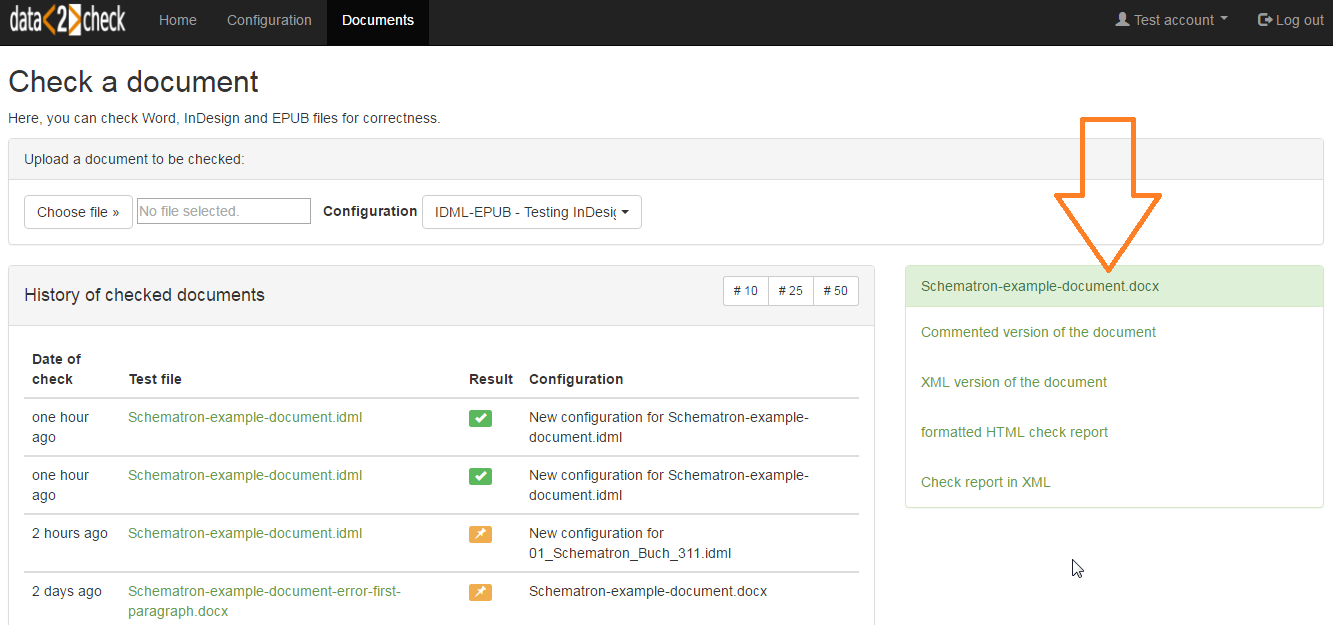
Figure 33: Listing of the check results after a successful document check.
All styles used in the Word template file as well as the root element are transformed into XML elements. Here, these elements can be renamed as well as, in part, deleted and unwrapped. The result of this transformation is a "raw XML" which may serve as a basis for further processing the document to other output formats, as for example HTML and EPUB.
2.6.1 The root element
The root element is automatically generated and appears first in the element list. By clicking the dropdown list you can select the »Rename« action and give the element a different name. Then, an input field appears where you can enter the new element name.
NOTICE: The »New element name« field must not be empty. The entry must start with a letter or an underscore, otherwise it is invalid and the configuration cannot be saved (see figure 34).
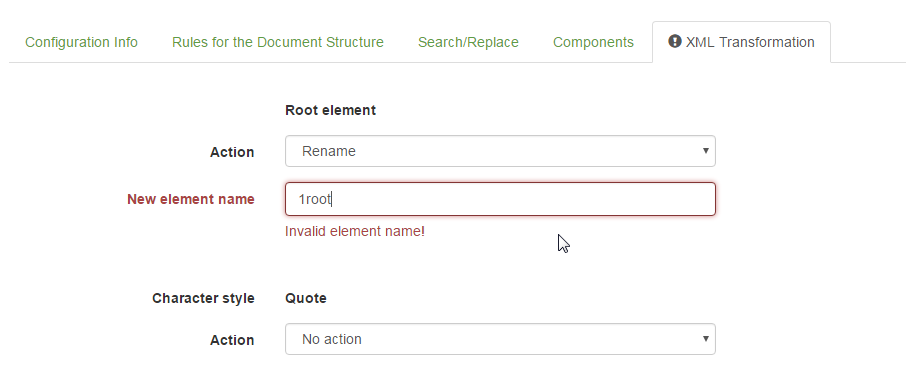
Figure 34: An invalid element name.
Please select »No action« if the root element shall not be renamed in the XML document.
2.6.2 The styles
After the root element the names of the paragraph and character styles used in the template file are listed in alphabetical order. Each style corresponds to a same named element in the automatically generated XML output file. The following actions are available (see figure 35):
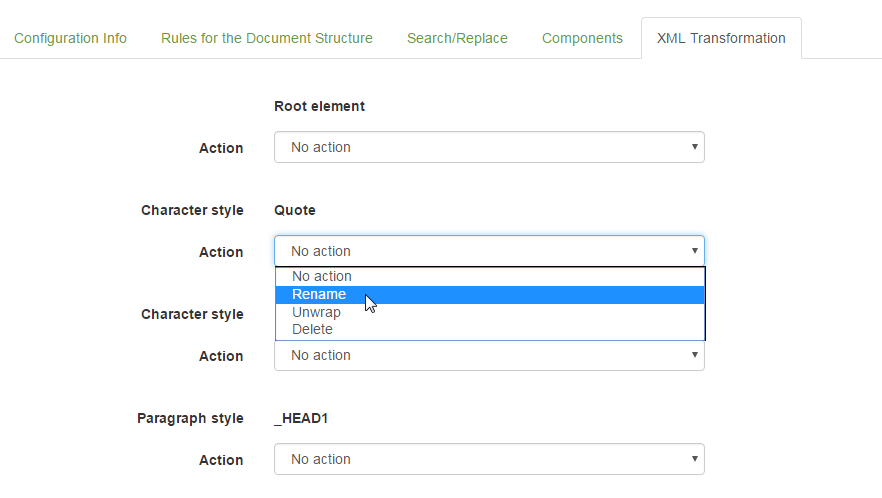
Figure 35: Renaming, unwrapping or deleting an element.
- No action: The element is not changed in the XML document.
- Rename: The element is renamed in the XML document.
- Unwrap: The element is resolved in the XML document, but the textual content is maintained.
- Delete: The element including its content is deleted in the XML document.
NOTICE: For the renaming of the styles the same rules apply as for the renaming of the root element (see figure 34)!
2.6.3 Generating a parent element
For the structuring of the automatically generated XML document a further feature is available: a so-called "container element" can be generated in order to, for example, create chapter structures. For this purpose, the following steps must be carried out:
- In the Rules for the Document Structure tab under the menu option »Configuration« (see under 2.3.2 Rules for the paragraph styles) you give a paragraph style the status of a heading (Function -> Heading level 1, etc.) or you have already done so.
- Then, you can generate a parent element for this paragraph style in the XML Transformation tab by selecting the »Rename« action. Now, under the »New element name« input field the checkbox »Surround with a container element« appears next to the respective paragraph style.
- By activating this checkbox, the »Surrounding element« input field appears where you can enter the name of the new element (see figure 36).
NOTICE: For the naming of the container element the same rules apply as for the renaming of the root element (see figure 34)!
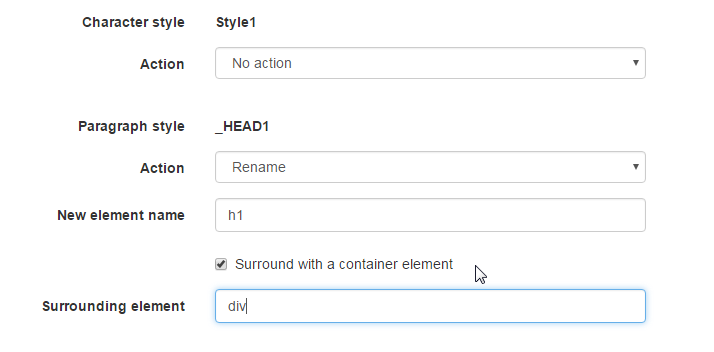
Figure 36: A parent element can be generated for an element with the status of a heading.
NOTICE: Please do not forget to save the configuration after adapting the elements for the XML transformation!
Now that you have edited your configuration, you can upload your Word documents under the menu option »Documents« and check them on the basis of your configuration. How to check a document is described in detail in the following.
3. Checking a document
Under the menu option »Documents« you can check Word documents with the help of a previously created configuration (see under 1. Creating a configuration and 2. Editing a configuration). After completion of a check, several output documents are available which can be viewed and further processed. These include a commented version of the checked document, an automatically generated XML document as well as an HTML check report (for futher informationen see under 3.2 The output documents).
3.1 The checking process
By clicking the »Choose file« button (see figure 37), your file manager opens, where you can select a document to be checked (see figure 38).
NOTICE: All formats of the files to be uploaded must be XML compatible. This means: please upload only files with the extension .docx for Microsoft Word!
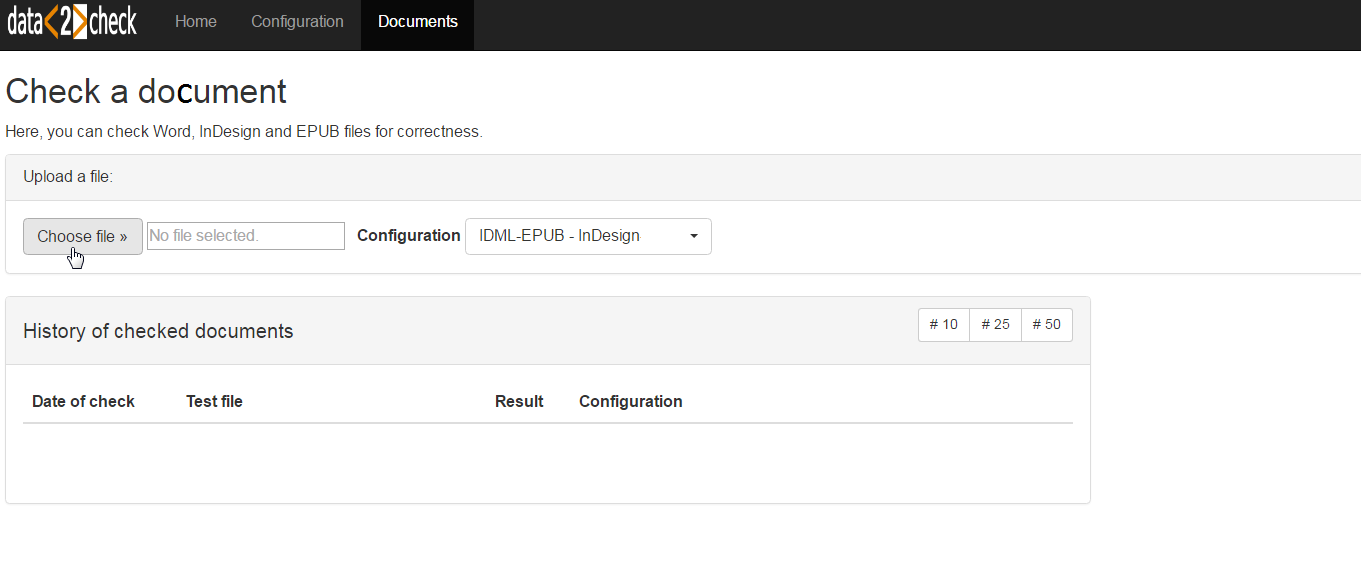
Figure 37: Upload of a document to be checked - Step 1: Clicking »Choose file« to open the file manager.
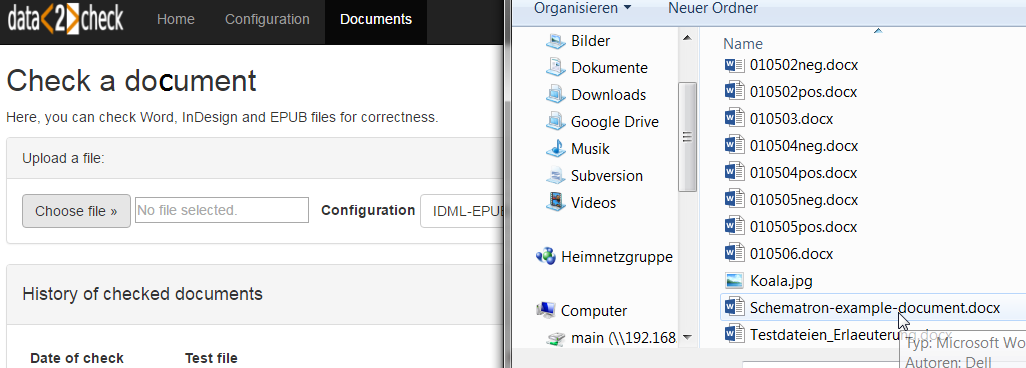
Figure 38: Upload of a document to be checked - Step 2: Choosing a .docx file.
After selecting a document to be checked via double-click, all configurations for Word already created appear in the dropdown list next to »Choose configuration«. The most recently created configuration always appears at the bottom of the list. Please select the configuration on the basis of which the previously selected document shall be checked (see figure 39).
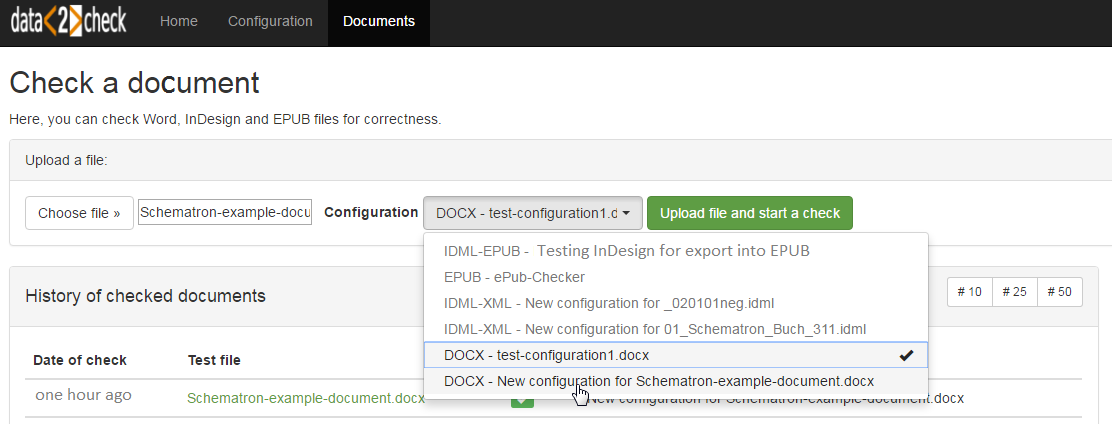
Figure 39: Available configurations after selecting a Word file (exemplary presentation).
After selecting the document to be checked and the appropriate configuration, please click the green »Upload file and start a check« button in order to start the checking process. Now, you will see a clock symbol which displays the progress of the check. This process may take some seconds (see figure 40).
Figure 40: The check of a document is in progress.
The document selected by you was successfully checked. After completion of the check, you can see the output documents on the ride-hand side (see figure 33).
Further information on the individual output documents can be found in detail in the following.
3.2 The output documents
Irrespective of whether a check was "successful" (no errors found) or "not successful" (errors found), always four output documents are displayed in the form of links:
-
Commented version of the document: By following this link, a Word output document is downloaded. This exact copy of your uploaded document to be checked contains Word comments on the errors found at the relevant paragraph (see figure 41). With the help of this commented version you can directly view any formatting errors in the Word document, correct them and then, where appropriate, upload the corrected document again for a check.
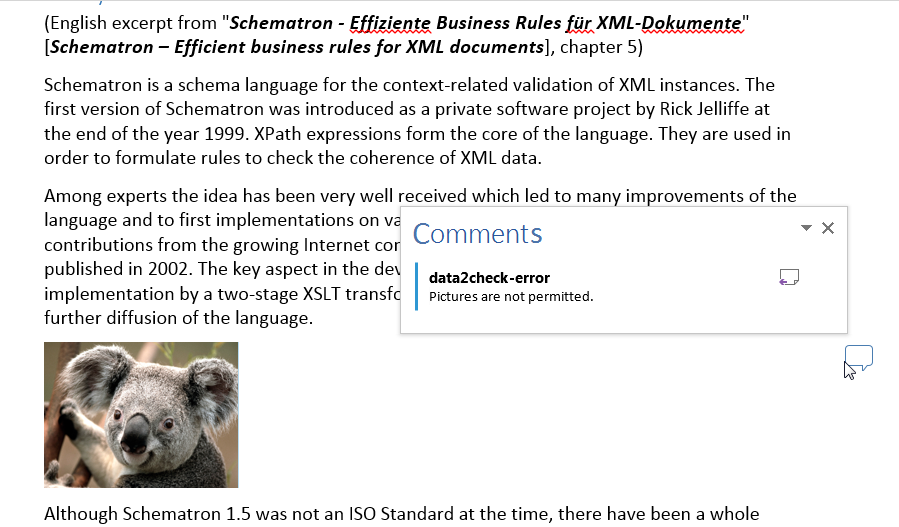
Figure 41: The commented version of the document to be checked.
-
XML version of the document: By following this link, an automatically generated XML document is downloaded. In this XML version of your document to be checked all styles were transformed into XML elements (see figure 42). These elements could be edited in advance in the XML Transformation tab under the menu option »Configuration« (see under 2.6 XML Transformation). This "raw XML" may serve as a basis for further processing into other output formats, as for example HTML, EPUB, etc.
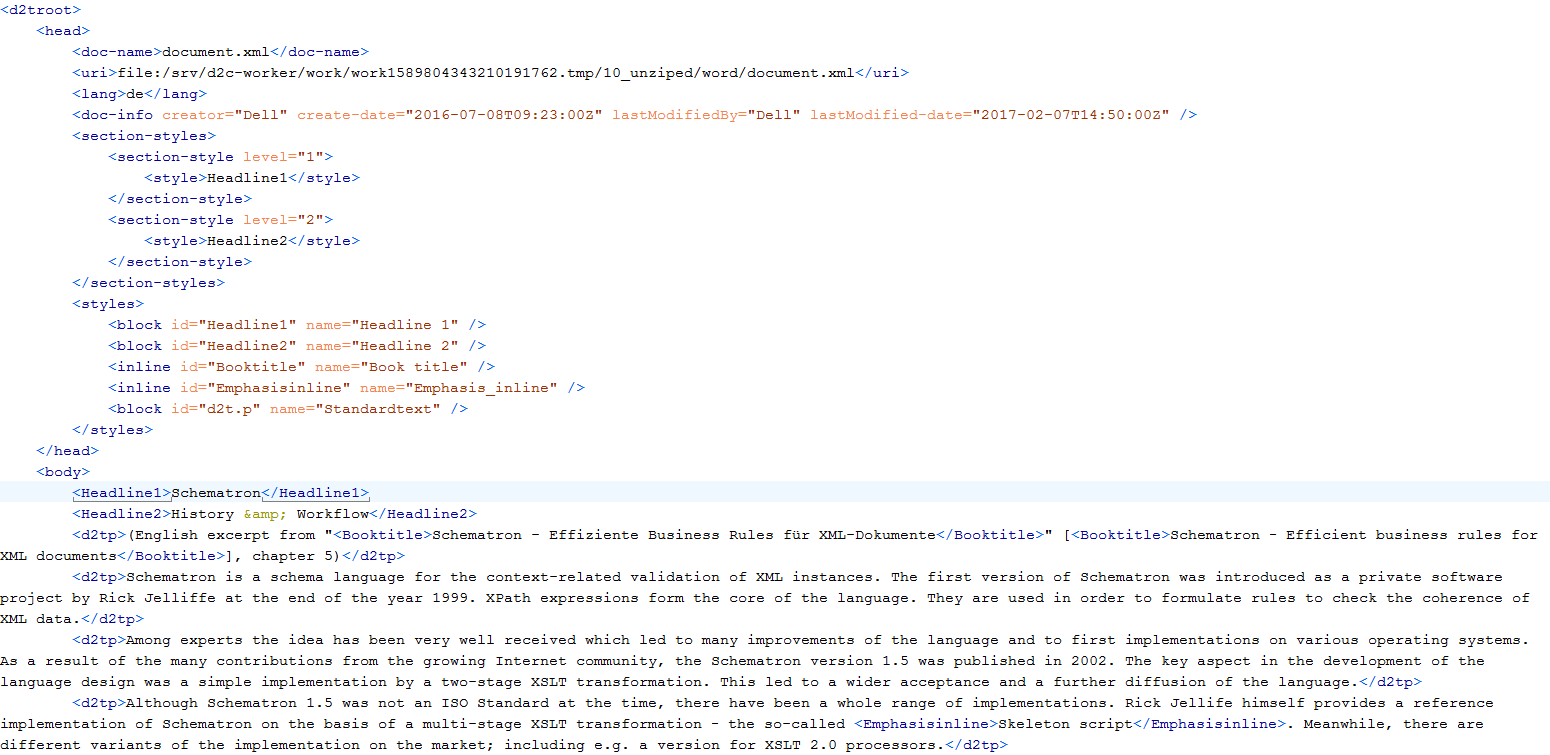
Figure 42: The XML version of the document to be checked (excerpt).
-
formatted check report: By following this link, a summary of the errors found during the document check and of the error messages is downloaded as HTML (see figure 43). With the help of this check report you gain an initial overview of the extent and seriousness of the errors in the Word document.
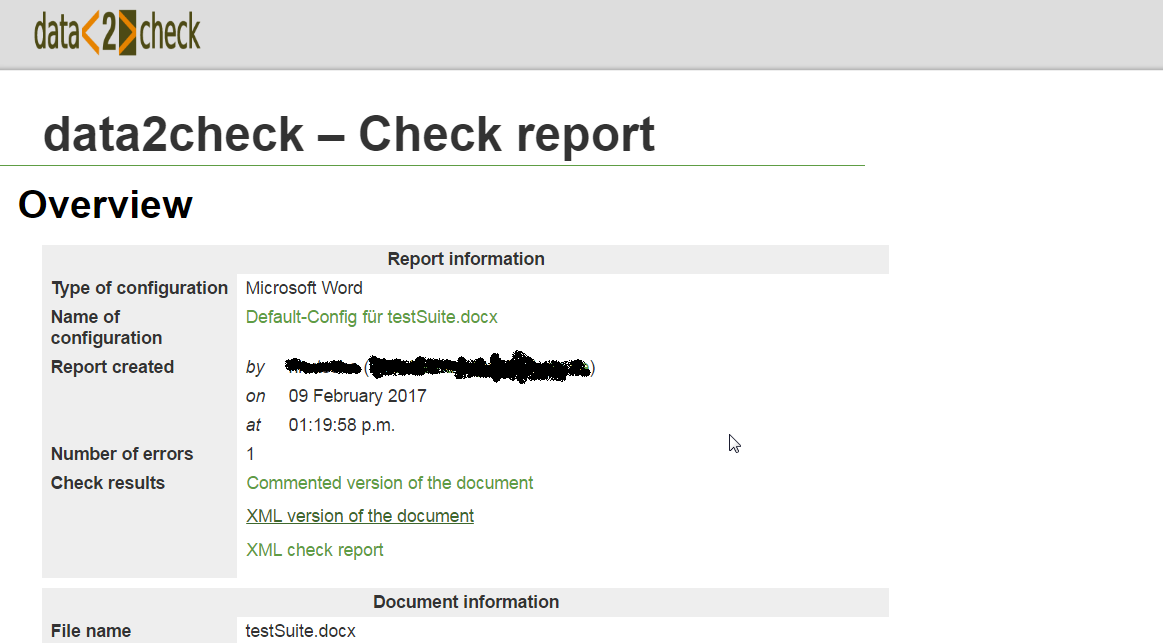
Figure 43: The formatted check report in HTML (excerpt).
In addition, you can directly see the errors found with the help of a browser preview. By clicking the »Details« section, all errors are listed and can be directly reviewed in the HTML version of your document when following the [Preview] link at the end of each list point (see figure 44).
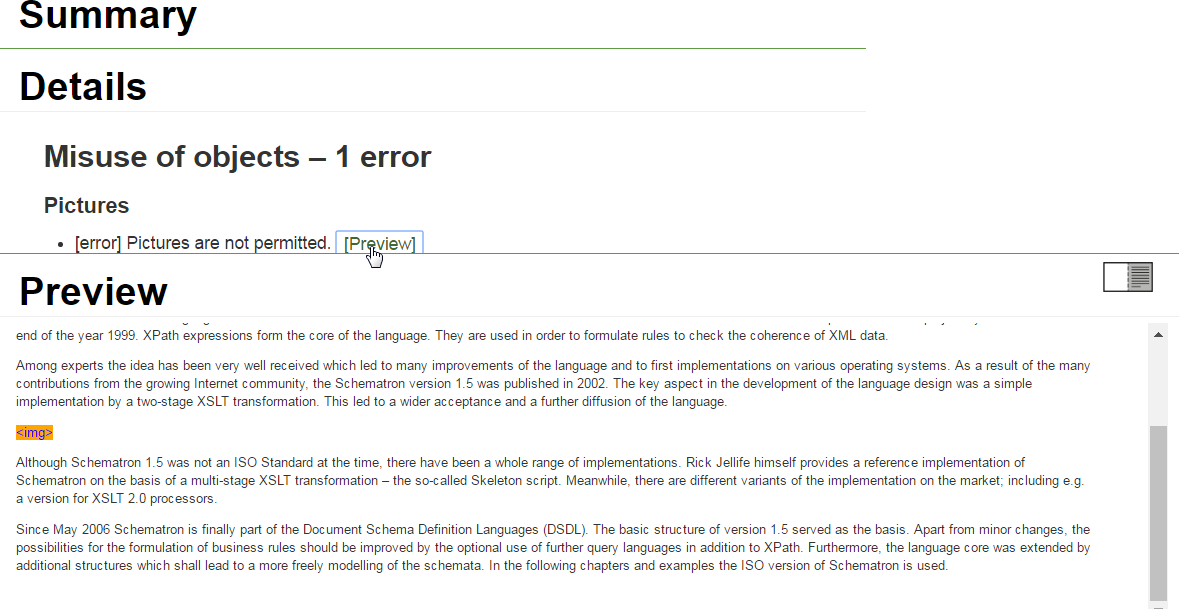
Figure 44: The preview feature in the formatted check report.
-
Check report in XML: By following this link, a check report in the SVRL (Schematron Validation Report Language) format is downloaded (see figure 45). This report can be used for further processing with XSLT or XPath.
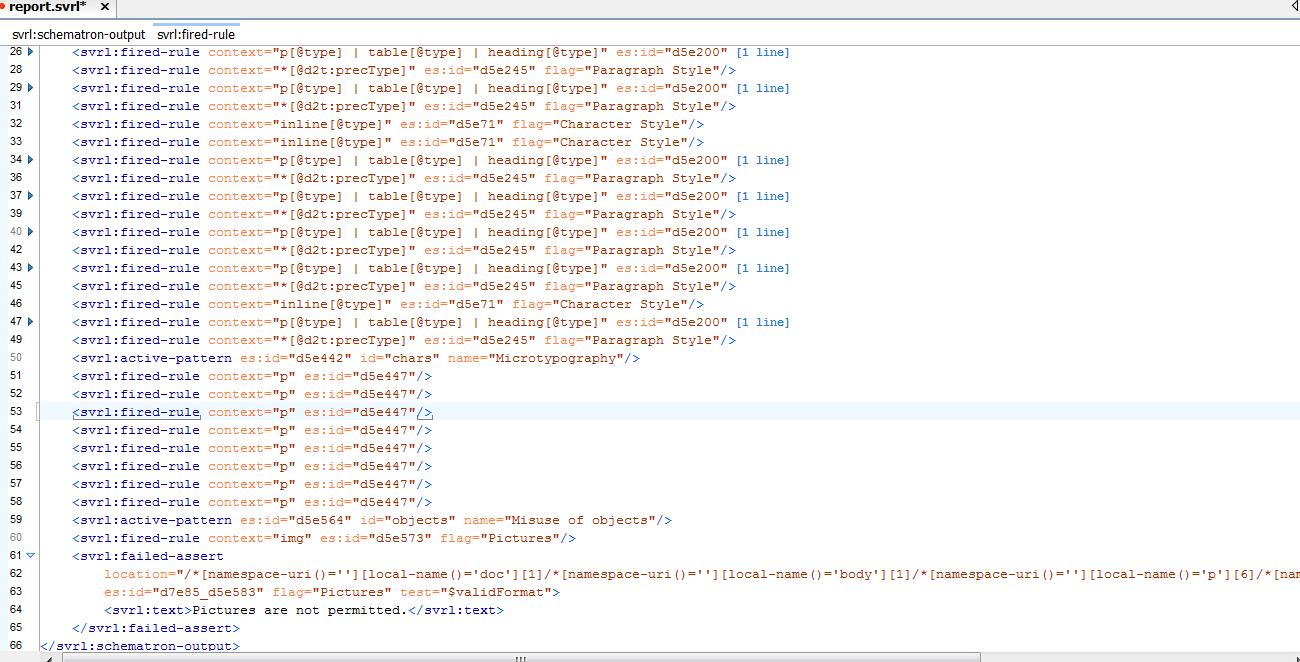
Figure 45: The SVRL check report (excerpt).
4. The history of checked documents
In the History of checked documents under the menu option »Documents« (left-hand side) all checks already carried out are listed in chronological order and access to the individual check results is granted. Therefore, the History of checked documents represents your personal database.
In this table all previous checks are listed including the time of the check (»Date
of check«), the name of the file to be checked (»Test file«), the result of the check
(green check icon (![]() ) for "successful check and no errors found", orange pin (
) for "successful check and no errors found", orange pin (![]() ) for "successful check but errors found" and red flash (
) for "successful check but errors found" and red flash (![]() ) for "check has failed, e.g. due to a system error") as well as the configuration
used for the individual check (see figure 46).
) for "check has failed, e.g. due to a system error") as well as the configuration
used for the individual check (see figure 46).
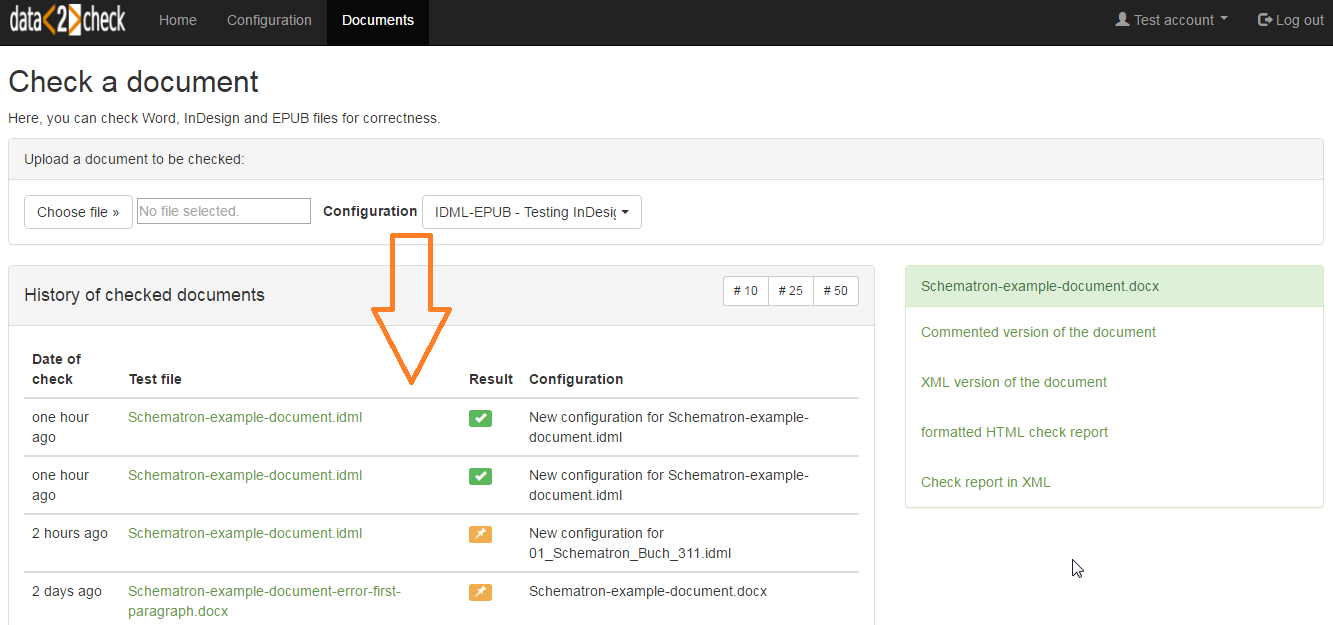
Figure 46: The History of checked documents.
By clicking one of the documents linked under »Test file«, the appropriate output documents appear on the right-hand side and can be viewed as described under 3.2 The output documents (see figure 47).
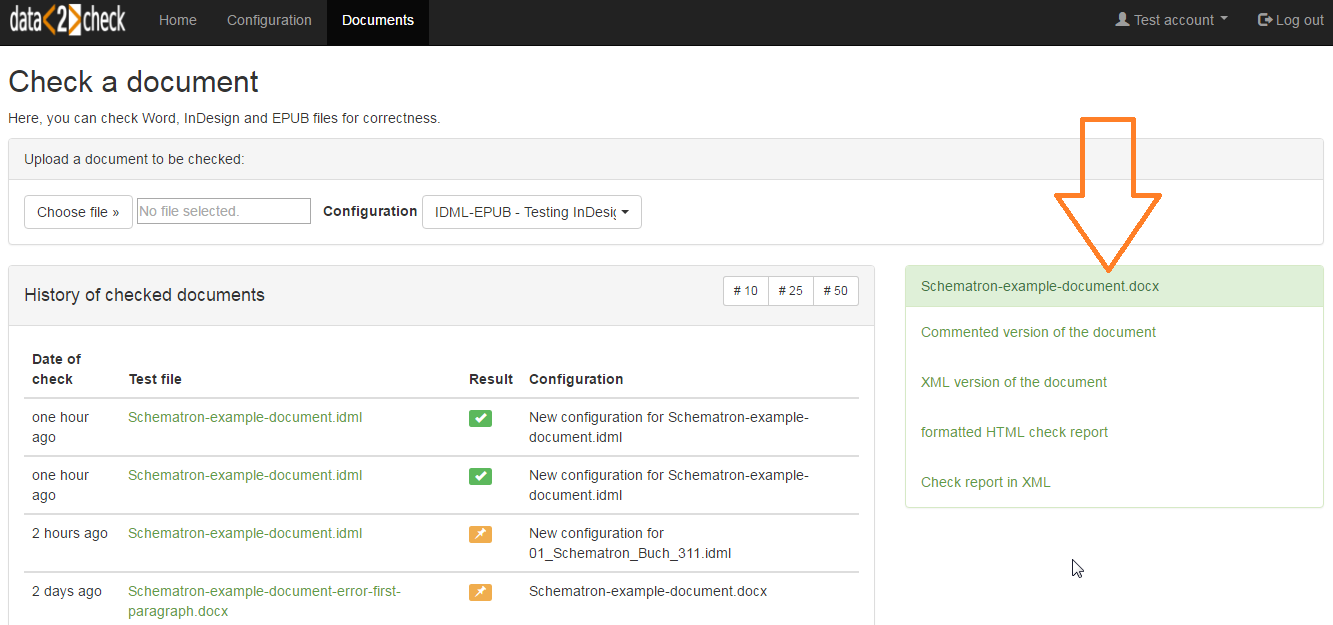
Figure 47: Listing of the output documents on the right-hand side.
Your History of checked documents can also be found on the data2check start page under the menu option »Home« (see under 4.1 Home in the general part of this help).